Recipes

Vegan "Cheesy" Broccoli Soup

This week brought some much-needed rain here on the East Coast of the U.S.  The trees were happy and our bellies wanted us to hunker down and eat some warm soup!  

This vegan and gluten-free Broccoli Soup brought us just the warmth and coziness we were looking for.  For Magnolia, this doubled as a dip - as everything seems to these days.  ;-)

The secret to the creaminess without the cheese in this soup is cashews!  They get soaked for a few hours, drained, and the blended with the other ingredients to get the desired texture; plus extra protein, fiber, and healthy fat!

The cashews are getting a bath before go-time!

The cashews are getting a bath before go-time!

The kiddos enjoying some comfort food!

The kiddos enjoying some comfort food!

VEGAN "CHEESY" BROCCOLI SOUP

Ingredients:

  • 2 cups cashews
  • 5 cloves garlic, minced
  • 1 medium onion, chopped
  • 3 cups vegetable broth
  • 2 cups broccoli
  • 1/2 cup nutritional yeast
  • 2 T coconut oil
  • 1 T turmeric
  • juice from 1 lemon
  • salt and pepper to taste

Directions:

  1. Soak cashews for 4 hours in enough water to cover.
  2. Drain and rinse cashews and set aside.
  3. Put coconut oil, garlic, and onions in large pot and sauté for about 5 minutes.
  4. Add vegetable broth, broccoli, nutritional yeast, salt, pepper, lemon juice, and turmeric.
  5. Bring to a boil and reduce heat to a simmer.
  6. Cook an additional 5-8 minutes - until broccoli is soft.
  7. Use an immersion blender or transfer 1/2 the soup into a regular blender.  Add cashews and blend until smooth.  *Note: Carefully cover top of blender with a towel and hold top on to prevent the hot liquid from leaking out through the top.
  8. Transfer second half of soup to blender and blend until broccoli pieces are smaller, but do not blend until smooth if you'd like more texture in your soup (for a very smooth textured soup, blend both batches completely).


Vegan "Cheesy" Broccoli Soup

Vegan "Cheesy" Broccoli Soup

Crustless Pumpkin Pie

It's the day before Thanksgiving here in the U.S. and most folks are either traveling to be closer with friends and family or hunkering down to get their meal prep on.  It's also day 3 of my GREAT and GRATEFUL week here at Tara Allen Health.  I'm grateful to have spent previous years helping patients in the hospital on Thanksgiving Day.  There's nothing quite like seeing how important you are in someone's day than when you are caring for them on a holiday while they're missing out on their own traditions back home.  Therefore, as I enjoy a day off with my family tomorrow (well, limited work - I am an entrepreneur!), I am grateful for the nurses, doctors, police officers, firefighters, and ALL service professionals that will be working hard tomorrow to keep this country running as safely and healthfully as possible.  I'm grateful for all experiences that have lead me to where I'm at currently - as a wife and mama to an infant and toddler, and a business owner that gets to CHANGE lives in the best way on a daily basis with a schedule flexible enough to allow me to "mom" when i need to "mom".  GRATEFUL!

Now to share something GREAT in celebration...

A little birdie told me you may be in a pinch for a last-minute Thanksgiving dessert recipe.  This pumpkin pie comes together quickly and is something you can feed your guests, young and old, and feel good about!  It takes about 5 minutes to prep, so throw it in the oven while you relax, chase your kiddos, or figure out how the heck to carve that turkey.  ;-)

Cheers to a peaceful, smiley, laughter-filled Thanksgiving to you all!

In health and gratitude,

Tara

CRUSTLESS PUMPKIN PIE


Crustless Pumpkin Pie


Ingredients:


15 ounces pumpkin puree (1 can)

1 cup coconut milk (full fat)

3 eggs

¼ cup honey or pure maple syrup (ok to sub with 1 T stevia for an even lower glycemic index)

¼ cup crushed walnuts or pecans

2 T chia seeds

1.5 tsp cinnamon

1 tsp ginger

1 tsp nutmeg

1 tsp pure vanilla extract

coconut oil (to grease pan)


Directions:


1.    Preheat oven to 350 degrees F.

2.    Grease baking pan with coconut oil.

3.    Mix all ingredients in blender, except crushed nuts.

4.    Pour mixture into pan and bake for 45 – 50 minutes.

5.    Top with crushed pecans / walnuts and allow to cool.

6.    Serve yourself a slice before it gets eaten all up.  ;-)

Snack Attack - Pumpkin Pudding

Raise your hand if you're on the pumpkin-everything-until-January bandwagon.

I'm right there with ya!  ;-)  If you answered no, first of all, what's wrong with you?  Kidding!  Or am I?  Regardless, you may know someone (like a child, a spouse, a friend) who DOES love pumpkin everything.  Here's a super-quick, easy, and healthy recipe that works well as a snack, a dessert, a dip for fruit, mixed into oatmeal, under granola, or on top of yogurt.  The kitchen is for creativity!  How do you plan to eat this Pumpkin Pudding?

In an earlier social media post, I promised you guys some nutrition facts.  I think there's a time and place for counting calories, protein, etc.  I don't believe it's for everyone or forever, no matter what your situation is.  I'm a strong believer in listening to your body, balancing hormones, reducing stress and cravings, and eventually being able to be so in tune with your own needs, that there's no food journaling or strict tracking needed.  That being said, it IS helpful sometime.  Example: If you want to start your health journey and have NO IDEA how many calories you take in on a typical day, you may want to track for a few days to get a baseline.  Or, as in this case, I created this recipe custom for a client of mine that has Gestational Diabetes.  She needed something high in protein, high in fiber, low in carbs/sugar, and wanted it very "pumpkin-y".  Haha!  So, here you have it...

  • 150 Calories
  • 8g fiber
  • 12g net carbs
  • 11g protein
  • 1 full serving of veggies
Pumpkin Pudding

Pumpkin Pudding

Ingredients:

  • 1/2 cup pumpkin puree
  • 4 T peanut flour (a.k.a. powdered peanut butter)
  • 1 tsp cinnamon
  • 1/2 tsp stevia
  • 1/2 tsp nutmeg or pumpkin pie spice

Directions:

1. This is the easy part - mix all ingredients together in a bowl / mug / cute cup.  That's it!  Enjoy immediately, store in fridge up to 3 days, or freeze and serve at a later date for your holiday party.

Enjoy.  In joy.  In health!

Tara

Cream of Mushroom Soup

Ladies and gents, it's November 11th / Veterans' Day... and the end of an interesting week here in America.  Thanksgiving is 13 days away and the temperatures are starting to fall here in NY.  What I'm trying to say is, bring on the soup.  All . the . SOUP!

This Cream of Mushroom Soup is a gluten-free, dairy-free version of the Thanksgiving Day classic.  Not only is it a great side dish to bring or serve for those with special dietary needs, it comes packed with protein and fiber to help you fill you up on the good stuff.  Make extra - you can freeze some to enjoy for a quick dinner when you come home late from holiday shopping. ;-)

This recipe calls for the soup to be pureed into a smooth, creamy consistency, but feel free to keep it "chunky" if you and your guests prefer it that way.  For comfort and toddler purposes, I went with the puree option this time and it worked out well.  

Toddler tip: Magnolia (3 years old now), taste-tested this recipe and helped me "adjust" the spices to her liking.  She also watched me chop the onions and garlic and put her two cents in about when the soup was done blending.  I let her lick the spoon after mixing and once I got the final chef's stamp of approval, I served her the soup over green beans.  All of this involvement requires front-loading of time - more time getting the kiddos involved in the prepping and cooking process will save you time, money, and stress of untouched meals.

Enjoy!


In health,

Tara

Cream Of Mushroom Soup to soothe the soul and enjoy this Thanksgiving! 

Cream Of Mushroom Soup to soothe the soul and enjoy this Thanksgiving!


Cream of Mushroom Soup


(Dairy-free, gluten-free)


Ingredients:


5 cloves garlic, minced

½ medium onion, chopped

2 cups mushrooms, chopped

2 cups chickpeas, cooked

2 cups cashew milk

1 cup coconut flour

2 T coconut oil

1 tsp Thyme

½ tsp sea salt

½ tsp pepper


Directions:


1.    In a large saucepan over medium heat, add oil, garlic, and onion.  Cook about 3-5 minutes (until onions become translucent).

2.    Add mushrooms and cook another 2-3 minutes.

3.    Add chickpeas, cashew milk, and coconut flour and bring to a boil.

4.    Reduce heat and let simmer for 10 minutes.

5.    Add thyme, salt, and pepper.

6.    Use immersion blender to puree (or transfer into regular blender in batches with towel firmly pressed over top of blender to prevent leakage).

7.    Enjoy as is or pour over cooked green beans or other veggies.


*This recipe is high in protein, high in fiber, and low glycemic.

Hello, November…and ALL the apples

Is it just me, or does the start of a new month make you giddy too?  It's a clean slate for personal and professional goals and brings new seasonal activities and holidays to be excited about!  November is synonymous with celebration in my household - from my husband's birthday, to Thanksgiving, a season of gratitude and reflection, the start of Christmas music and decorations, and delicious, yummy-smelling, warming comfort foods!

Did you get to go apple picking this year?  Or maybe you'll be heading to a farm or farmer's market next weekend?  There's always a joy in picking the perfect apples and then a bit of confusion that sets in when you try to decide what to do with your robust harvest, right?

I have a solution...

Spiced Crockpot Apple Cider - Tara Allen Health

Spiced Crockpot Apple Cider - Tara Allen Health

Spiced Crockpot Apple Cider

Ingredients:

  • 18 cups water
  • 12 medium apples
  • 2 oranges
  • 3 cinnamon sticks
  • 1 tsp nutmeg
  • 1 tsp cloves
  • 1/2 tsp ginger
  • 1/2 tsp cardamom
  • pinch black pepper

Directions:

  1. Slice apples and oranges.
  2. Place all ingredients in crockpot.
  3. Cook on low for 7-8 hours.  Warning: You house will smell so amazing at this point that you're likely to cancel all plans and stay home. :-)
  4. Strain all contents through colander into a large bowl.
  5. Strain once again through a nut milk bag or cheesecloth into a large bowl.
  6. Your cider is waiting for you!

"But Tara, I don't want to waste all the fruit and spices!"

Yup…I hear ya.  Throw it into a pitcher with red wine (or seltzer for an alcohol-free option) for a festive Sangria.

You're welcome.

Do you want to make sure you don't miss more recipes like this? Join the newsletter!  It's a healthy / food-y / family-y / fitness party in your inbox.


Enjoy in health,

Tara

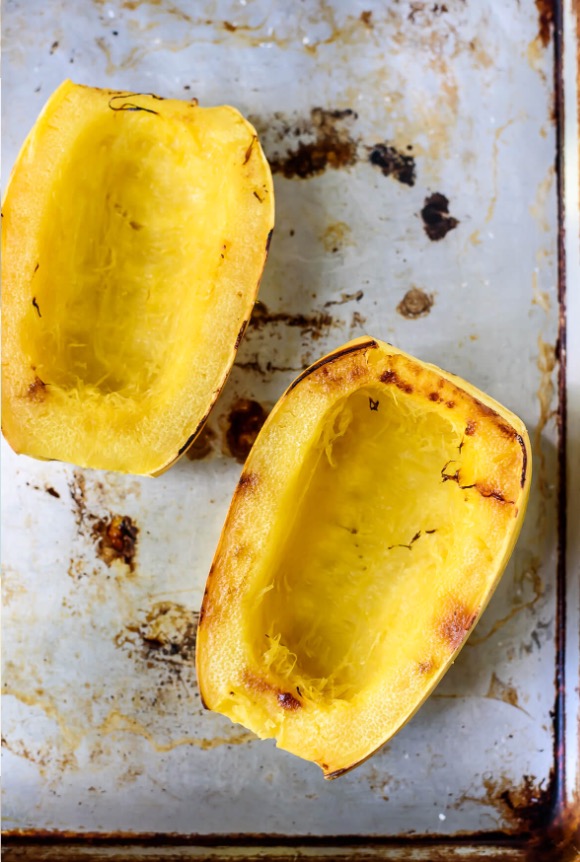
Spaghetti Squash Hack

SpaghettiSquash.jpg


These suckers are fun, delicious, versatile, did I mention fun?!  :-)  But, have you noticed none of your knives seem to be able to cut them open?  It used to take longer for me to cut open the vegetable than it did for my oven to preheat to 400 degrees!

Until now...

Try this: Score the spaghetti squash all the way around with your knife.  Then throw it in the microwave for 3.5 minutes.  (Carefully) remove and resume cutting.  It's not as seamless as getting through a banana, but you'll notice a big improvement.

Then, just place the two halves on a baking sheet and bake at 400 degrees for 40-50 minutes.

Some ideas for toppings:

  • tomato sauce and cheese
  • avocado, cilantro, and garlic
  • olive oil, lemon juice, salt, and pepper
  • baked apples, cinnamon, and coconut oil for a sweet version
  • dill yogurt sauce with chopped cucumbers
  • pumpkin puree, cinnamon, nutmeg
  • hummus and sriracha for an uber-quick, creamy / spicy dish

Now that I saved you 10,561 hours of cutting time, what do YOU plan to make with the spaghetti squash?  Bonus points for creativity.  ;-)

Immune-Boosting Latte

You guys, I have barely been able to get used to it being September already and now September is coming to an end this week?!?  What the what?!  Wow!  

Well, I'll tell you what….at least the time is flying with things happening behind the scenes.  ;-)  Hint hint; wink wink.  You've asked and I'm listening.

Fall is upon us and there's something about this season that truly energizes me - more than in an I'm-shivering-for-the-first-time-in-half-a-year kinda way.  I suppose you can liken it the calling of a deep clean that Spring thrusts upon us.  Maybe it's my mind's rebellion against the days getting shorter.  Or, maybe it's the bubbling of excitement over the holidays coming.  I like a good party - can you blame me?  These days the onslaught of holidays start with my daughter's birthday next month and will end with my son's birthday in January.  Who knows (and who cares) though, right?!  When I can reign in the flurry of ideas just a bit, I am super-productive in the Fall.  I'm just going with it. (Note: Super-productive IS a relative term with a toddler, baby, new house, clients, etc.)

So….Autumn is here.  Bugs will be buggin' off soon and germs will be multiplying in their place.  Did you know whether you get sick or not has a lot less to do with what you "catch" and a lot more to do with how strong your immune system is?  We're filthy beings…covered in germs all the time despite the best hygiene.  Working on your health from the inside out is a great place to begin to ward off many colds/viruses or at least kick them out a day or 2 earlier.

The idea for the immune-boosting latte came to me while I was making my morning cup o' joe one day.  I was headed to the gym and wanted a little energy before my workout, but not a full meal.  While adding coconut oil to my coffee for a little taste and energy, I couldn't help but think about how this would be a great time to consume some turmeric, as the coconut oil aids in its absorption.  So does black pepper.  Then I needed something else to help mask that flavor while bringing added health benefits: cinnamon!  I used a tad bit of honey to sweeten as an experiment because raw honey is excellent in helping to fight all kinds of microbes.  I added my cashew milk as usual.  Wouldn't ya know - blended all together it actually tasted GREAT!  Not only was the taste on point, but the texture was creamy with a little froth on top.  A fancy latte for a fraction of the price, a 20 foot commute to the kitchen, no refined sugar, no gluten, no dairy, no weirdness anywhere in the recipe, and a good deed done for my immune system (you're welcome). Yup!

Here you have it: IMMUNE-BOOSTING LATTE...

"Sugar and Spice" - Tinkerbell mug for this Immune-Boosting Latte.

"Sugar and Spice" - Tinkerbell mug for this Immune-Boosting Latte.


To a blender, add:

  • 1 cup of coffee
  • 1/4 cup non-dairy milk (I used cashew milk)
  • 1 T coconut oil
  • 1/2 tsp turmeric
  • 1/2 tsp cinnamon
  • 1 tsp - 1 T honey or sweetener of choice (depending on taste preference)
  • pinch of black pepper

Blend and enjoy the creamy, frothy goodness!

P.S. Use a Tinkerbell mug as pictured to complete the pleasurable experience.  ;-)

A Delicious Alternative to the Summer Burger...

Sweet Bean Veggie Burgers

(Vegan, gluten-free, soy-free)


The burgers are all ready to go in the oven…mmm!

The burgers are all ready to go in the oven…mmm!


Ingredients:


·      2 large sweet potatoes, baked and peeled

·      1 cup black beans, cooked and mashed

·      1 ½ cups quinoa

·      1/2 cup onions, chopped

·      ½ cup spinach, chopped and slightly wilted on stovetop

·      1/3 cup ground flaxseed

·      2 cloves garlic, minced

·      1 t turmeric

·      1 t paprika

·      salt and pepper to taste


Directions:


1)  Preheat oven to 375 degrees.

2)  Combine all ingredients in large mixing bowl with fork.

3)  Grab handful of mix and pack tightly into a ball.  Each should be roughly the size of your palm for even baking and serving size.

4)  Place ‘burgers’ onto a greased baking sheet or parchment paper, a few inches apart.  Flatten to make a patty.

5)   Bake 35-40 minutes, flipping the burgers halfway.

6)  Allow to cool for 5 minutes before removing with spatula.

7)  Add your favorite toppings!  For me, that means avocado, sliced onion, and sliced tomatoes. 

8)  Enjoy!